
This Best Camera Backpack for Travel & Photography post contains affiliate links. If you make a purchase through these links, we may earn a commission at no additional cost to you. Learn more at my affiliate disclosure page.
Why Your Camera Bag Matters When You Travel
Wherever I go, my camera bag goes too. From chasing birds in Morro Bay to capturing volcanic landscapes in Iceland, street scenes in Japan, alpine sunrises in the Eastern Sierra, and hiking the Narrows in Zion, I’ve carried gear through just about every kind of terrain. Over the years, I’ve tested countless setups—each picked for a different trip, location, or shooting style. If you’re looking for the best camera backpack for travel photography, this guide covers the bags I’ve actually used—and trust—on real trips.
If you’re a photographer, you know one bag is never enough. This post is my personal roundup of the best camera backpack for travel photography—and a few other favorites—that I’ve used and trusted. From stylish city slings to rugged hiking packs, these are the bags that have been with me on some serious adventures.
My All-Time Favorite Camera Backpack for Travel Photography, Landscape Adventures & More
Out of all the travel camera bags I’ve tried over the years—and believe me, I’ve gone through quite a few—the BackLight 26L by Think Tank is the one I always come back to. I’ve carried it through airports in Japan, hiked with it through the Narrows in Zion, photographed the Horsetail Fall in Yosemite, and used it for early morning bird photography in Morro Bay State Park. It’s been dropped in the dirt, soaked in the rain, and stuffed under airplane seats—and it still holds up.

This is the best camera backpack for travel photography I’ve used. It’s compact but somehow fits everything I need, and it’s comfortable enough to wear all day, even on long hikes or travel days.
What I Love About the BackLight 26L
I love that it fits a full kit without feeling bulky. I usually carry my two Nikon Z camera bodies—the Z 8 and Z 7II—and I’ve packed as many as five to seven lenses, plus extras like batteries, a filter pouch, and even my 16-inch MacBook Pro. And somehow, it all fits without turning into a brick. The layout makes it easy to keep everything organized and accessible without feeling like I’m hauling a giant photo studio on my back. I don’t usually carry my NIKKOR Z 100-400mm lens unless it’s a special trip, but it can fit that too—as long as it’s detached. There are also tons of zippered compartments inside, so I’m not digging around for memory cards or charger cables. I know exactly where everything is.
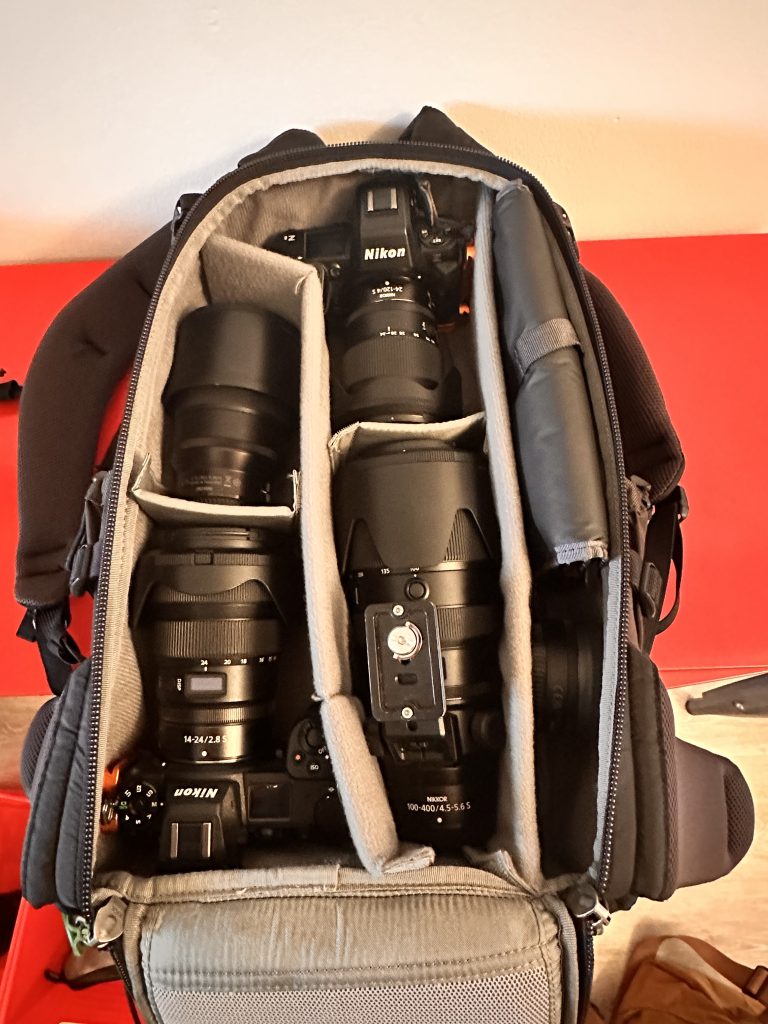

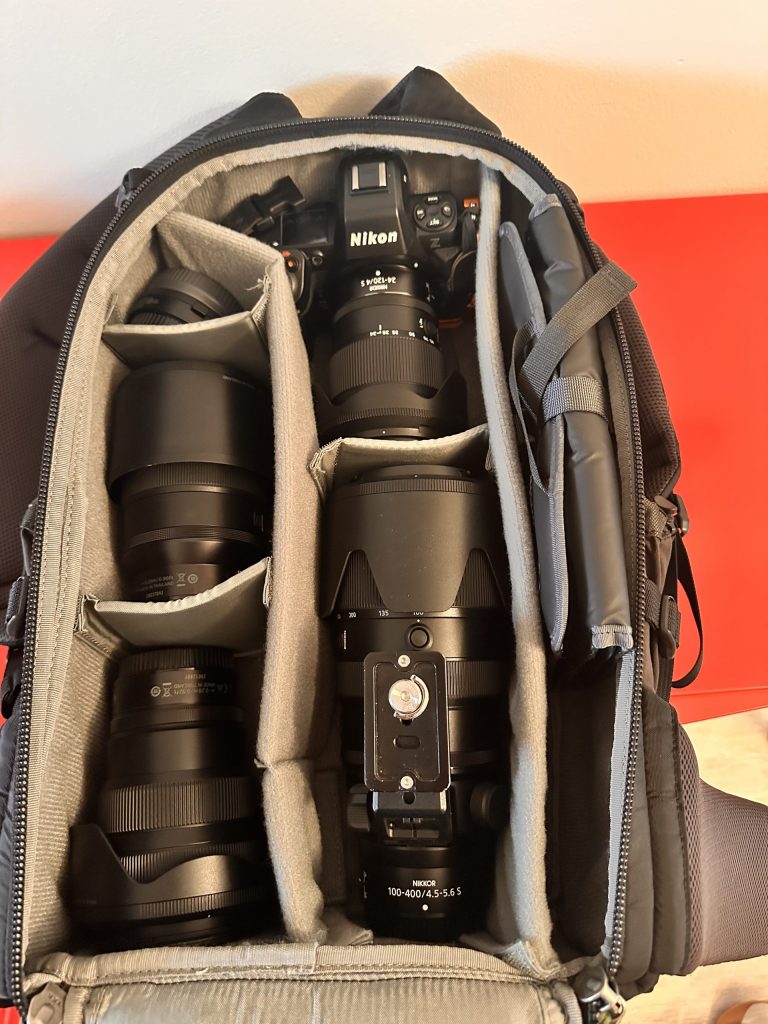
There’s a small zipper at the top that I use for my passport and travel docs when I’m flying—super handy when you’re fumbling at security. The side pockets fit a water bottle and a mini tripod, and the back-panel access to the camera gear makes me feel a lot more secure when I’m in a crowded place or on the move.
Comfort-wise, it’s one of the best I’ve worn. The straps are padded just right, and the mesh back panel keeps me from overheating on long hikes. The waist belt actually helps, especially when I’m carrying heavier gear or hiking uphill for a while. And when it rains? I just pull out the built-in rain cover and keep going. This bag’s comfort is what got me through 10 miles on the Tomales Point Trail in Point Reyes.
All of that makes this bag ideal for day-long shoots, landscape photography trips, and any kind of travel photography where flexibility really matters. Whether I’m heading out with a stripped-down kit or bringing everything I might need, the BackLight 26L adapts to the moment.
What Could Be Better
It’s not a lightweight bag, especially once I load it up with a laptop. And the side pockets are a little snug if you’re trying to fit a larger water bottle. I also wouldn’t take it on a minimalist trip—but that’s not what I use it for. This is my all-in, do-everything camera backpack for when I need options and don’t want to compromise.
I’ve been using the BackLight 26L for years now, and it still looks almost brand new. The build quality is that solid. The zippers are smooth, the fabric hasn’t worn down, and nothing about it feels flimsy or tired, even after countless hikes, flights, and road trips.
Whenever I need one bag that can handle it all—travel, hiking, and working in the field—this is the one I reach for. Out of all the travel camera bags I’ve owned, the BackLight 26L is easily the most reliable and thoughtfully designed.
Other Travel Camera Bags I Use & Recommend
I don’t believe in the idea of a one-size-fits-all camera bag. Over the years, I’ve built up a collection of travel camera bags that I reach for depending on where I’m going, what I’m shooting, and how much gear I want to carry. Below are the bags I regularly use, broken down by type and purpose.
Lightweight Daypack Camera Bag
BackLight Sprint by Think Tank
This is the bag I keep packed and ready to go. Whether I’m heading out for a quick morning hike, chasing light during sunset, or photographing pelicans along the coast, the BackLight Sprint is the bag I grab most often. I love how lightweight and compact it is, and it still has enough room to carry my Nikon Z 100–400mm lens attached to my camera body.

There’s just enough space for a water bottle, tripod, and the essentials. I use this for minimalist setups when I want to travel light but still have a fully functional kit.
And I have to say—I love the green color. This is my everyday, go-to, grab-and-go camera bag, and it’s perfect for spontaneous shoots when the light turns magical.
Gear Capacity:
- Holds 1 camera body + 2–4 lenses
- Can fit a Nikon Z 100-400mm lens with camera body attached.
- Fits a small drone or flash
- Rear access + tripod mount + waist belt for support
Rugged, Lightweight Hiking Bag
Lowepro PhotoSport BP 24L AW III
When I need to stay light and mobile—like on steeper hikes or action-packed days—I go with the Lowepro PhotoSport BP 24L. It’s built more like a hiking pack, with side camera access and a removable insert for your body and lens. I use this bag when I don’t need my long lens—just one camera and maybe a spare.
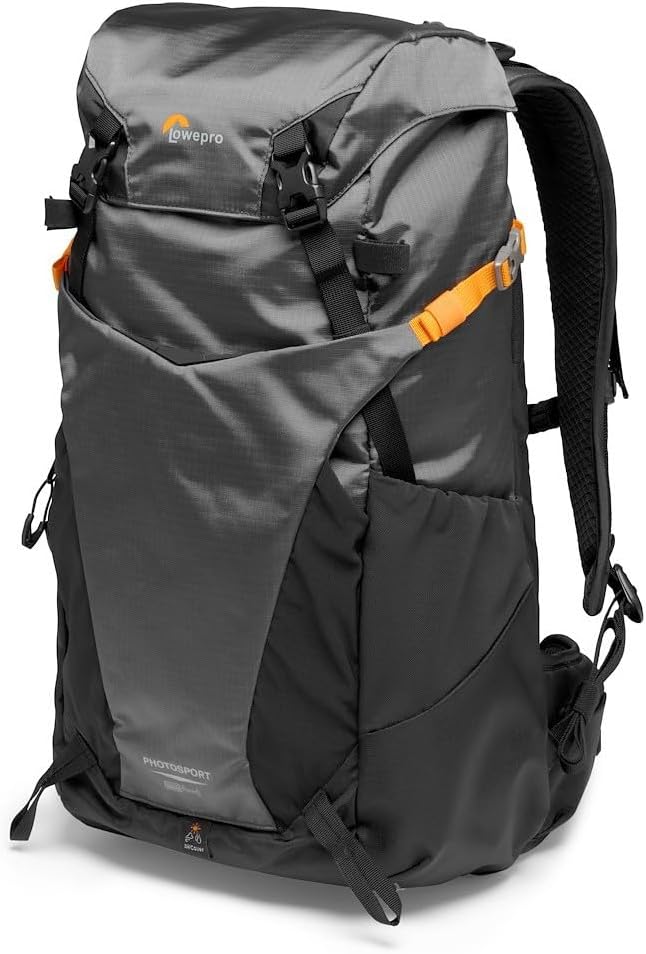
It’s ideal for photo hikes, day trips, or travel days when I also want to carry some hiking gear like a light jacket or poles. It’s a great blend of comfort, versatility, and protection.
Highlights:
- ActivZone harness for breathable comfort
- Fits one camera body + lens in removable insert
- Lightweight but durable build
- Great for fast-paced hikes or travel days
Compact Crossbody for the City
f-stop Navin Camera Holster
When I’m exploring a city or just want something super simple, I use the f-stop Navin camera holster. It’s compact but padded, fits one camera body with a lens attached (up to 70–200mm), and has a shoulder strap that lets me carry it crossbody or over one shoulder.
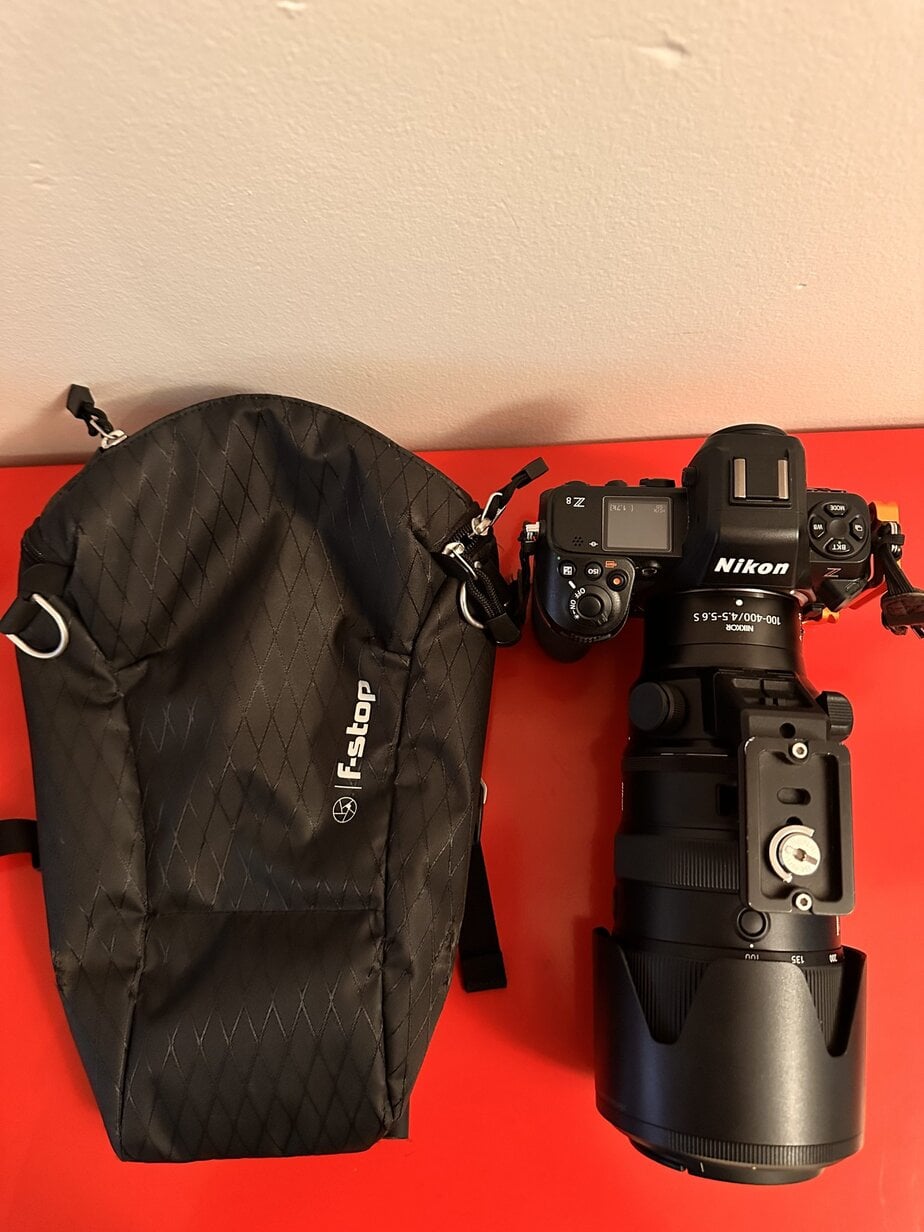
I’ve taken this on city trips where I want to be discreet but ready to shoot—places like Japan or European streets where I don’t want to look too “geared up.” It also fits perfectly inside a tote or daypack if I need to stash it.

Why I Love It:
- Super compact and modular
- Works solo or as part of a bigger kit
- MOLLE straps to attach to other bags
- Great for street photography or museum days
Fast Access in the Field
Think Tank Rotation 22L
The Rotation 22L is my go-to when I need quick, in-the-moment camera access. I used it in Zion while hiking the Narrows, and the rotating belt pack made all the difference. You don’t have to take the backpack off—you just slide the belt around, unzip, shoot, and stash the camera back.
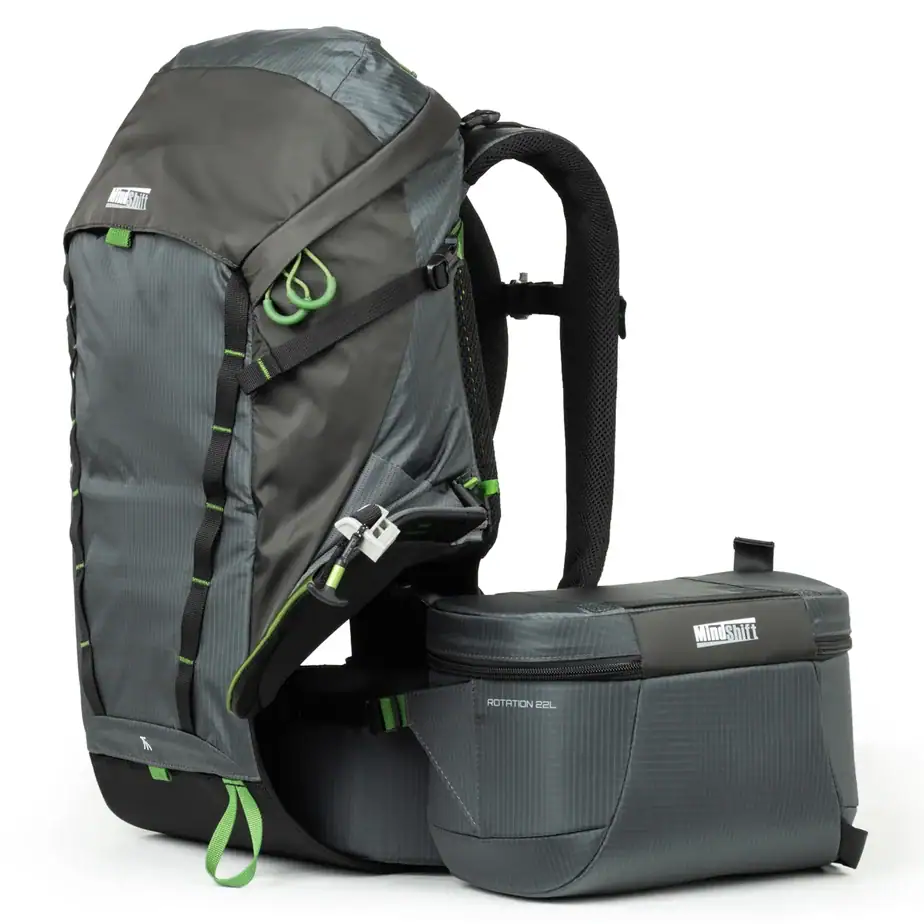
This bag feels like having two in one. The belt pack detaches when I want to go lighter, and the rest of the backpack still holds gear, snacks, layers, and more.
Features I Love:
- Rotating belt pack = camera access in 3 seconds
- Magnetic closure with full zipper backup
- Great for active shooting when I don’t want to stop
- Built-in versatility for field work
Side-by-Side Comparison of My Favorite Camera Bags
Here’s a quick breakdown of the best camera backpacks for travel photography I’ve personally tested.
| Camera Bag | Best For | Camera Capacity | Laptop Sleeve | Access Type | Weight/Comfort |
|---|---|---|---|---|---|
| BackLight 26L | Full-day shoots, travel, landscape photography | 2 bodies + 5–7 lenses | Yes (16″) | Back-panel | Excellent; full waist belt + breathable back |
| BackLight Sprint 16L | Lightweight hikes, minimalist setups | 1 body + 2–4 lenses | No | Back-panel | Very lightweight; minimal waist support |
| PhotoSport 24L | Hiking-focused travel days | 1 body + lens in insert | No | Side access | High mobility; hiking harness style |
| F-Stop Navin Pouch | City trips, crossbody carry | 1 body + lens (up to 70–200mm) | No | Top zip | Very compact; no waist/strap system |
| Think Tank Rotation 22L | Action shooting, hiking, quick access | 1–2 bodies + several lenses | Yes (13″) | Rotating belt + top panel | Good support; active movement friendly |
How to Choose the Right Camera Bag for Travel
After years of shooting in cities, deserts, coastlines, and canyons, I’ve figured out exactly what matters most in a travel camera bag. Not every trip calls for the same setup, but these are the features I always consider before packing (or buying) a new bag.
Size and Airline Compatibility
If you travel often, a camera bag’s dimensions matter more than you think. I always look for something that can fit in an overhead bin or under the seat—especially on smaller or international flights where bag restrictions are tighter.
Some of my favorite bags, like the BackLight 26L, hit that sweet spot: they’re large enough to carry real gear, but compact enough to fly with. I also try to pack in a way that avoids drawing too much attention—especially when I’m carrying expensive gear in unfamiliar places.
Weight and Comfort for Long Days
The weight of a bag might not seem like a big deal until you’ve been wearing it for 8+ hours. I’ve learned the hard way that bad shoulder straps or poor padding can ruin a great shoot. If I’m hiking, I want a bag with a hip belt, breathable back panel, and smart weight distribution—especially when I’m carrying longer lenses or a full kit.
For quick outings or lighter setups, I reach for bags like the BackLight 16L or PhotoSport 24L, which are super lightweight but still give me the support I need for shorter hikes or city days.
Compartments, Access, and Tripod Holders
I’m big on organization. I want my memory cards, batteries, and filters to be exactly where I expect them—no digging, no fumbling. That’s why I love bags with well-designed compartments and rear access that doesn’t force me to open the whole bag in the dirt.
Side access is a bonus for quick swaps, and rear access (like in the BackLight series) gives me peace of mind when I’m in crowded places. I also look for a tripod holder and space for a water bottle—two simple features that make a big difference when you’re moving around all day.
Travel Camera Organizers & Accessories I Always Pack
Not everything I carry is a backpack. Over the years, I’ve found a few key camera gear organizers that help me stay efficient, especially when I’m switching setups, packing a suitcase, or working out of a larger travel bag. These aren’t flashy, but they make all the difference when I’m shooting on the move.
Camera Inserts & Packing Cubes
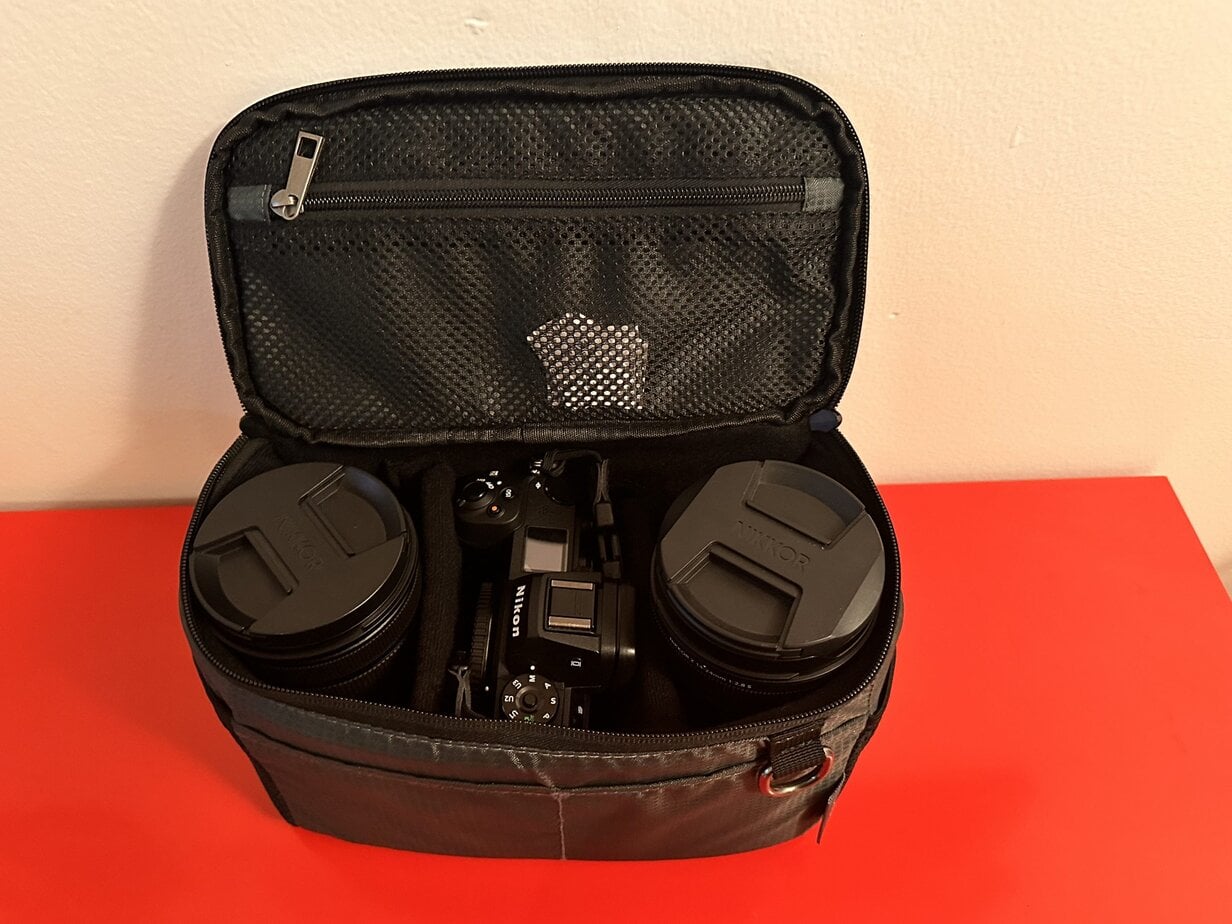
MindShift Gear Stash Master
This is my go-to camera cube when I want to pack my gear inside a suitcase or larger hiking backpack. It fits a full mirrorless setup with room for lenses, and it adds structure to whatever bag I’m using that day. I love how padded and secure it feels.
S-ZONE Camera Insert Bag
When I’m going minimalist or want to convert a tote or casual backpack into a camera bag, this insert does the trick. It’s super affordable, lightweight, and offers basic protection. Not as padded as some higher-end cubes, but useful for short city outings.
Filter Organizers I Use for Travel
MindShift Gear Filter Nest
My ND and polarizing filters live in this case. It’s compact, padded, and easy to stash in any of my camera bags. Keeps everything clean and scratch-free, even after years of use.

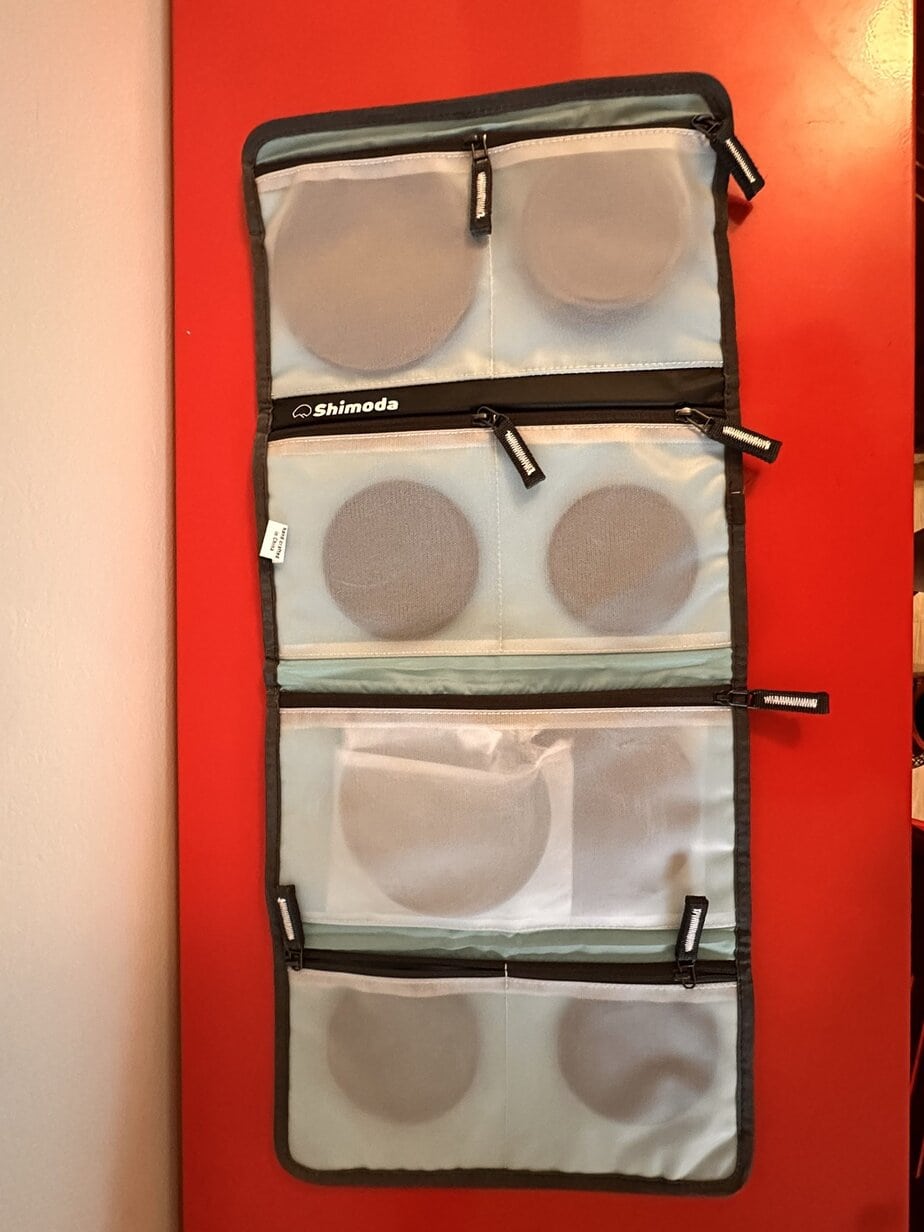
Shimoda 4 Panel Wrap
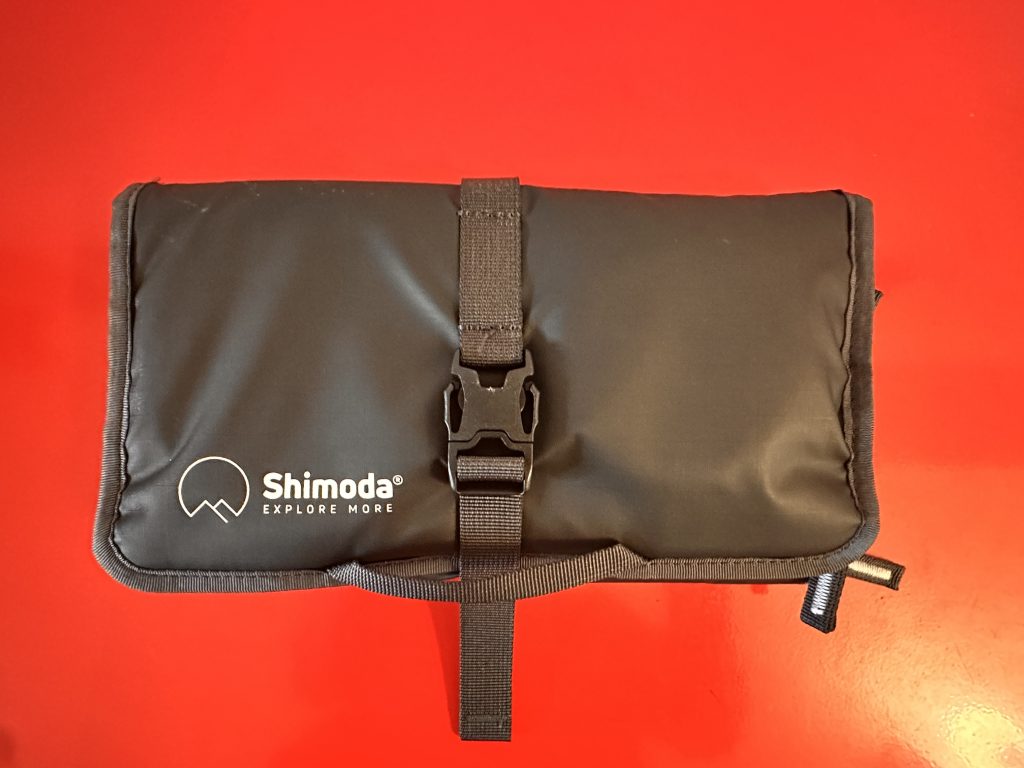
I use my Shimoda 4 Panel Wrap to keep all my filters organized in one place, and what I love most is that the four-panel version actually fits my 112mm filter—which is incredibly rare. Most filter cases can’t handle that size, but this one does it easily. It folds flat, keeps everything visible, and fits into even my most compact camera bags.
Accessory Pouches I Always Carry
Shimoda Accessory Pouch
My Shimoda Accessory Pouch holds all my must-have items in one place—extra batteries, SD cards, tools to fix my tripod, my shutter cable, a lens cloth, and a few other essentials. No matter which bag I’m using, this pouch always comes with me. It’s saved me more times than I can count.
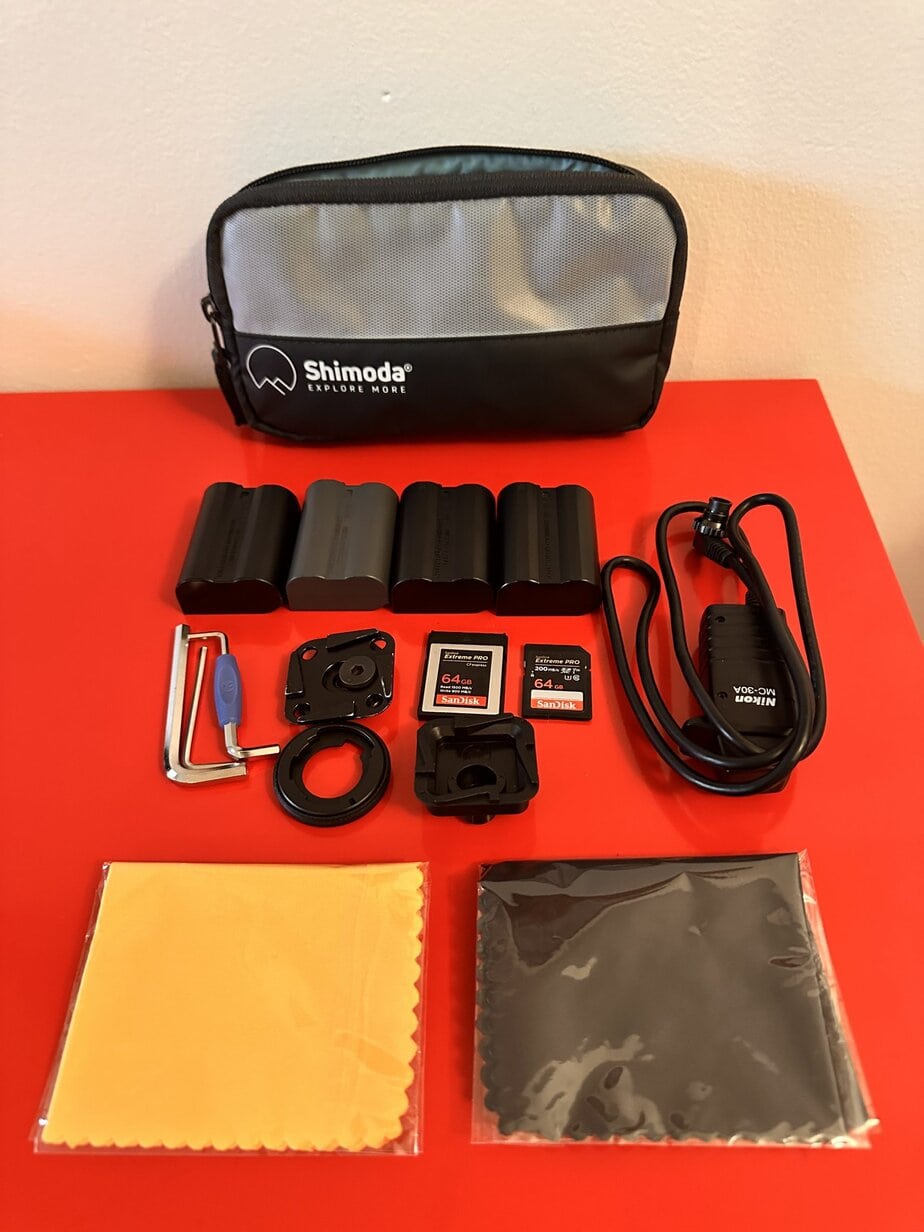
It’s small enough to fit in any bag, but roomy enough to carry everything I rely on. Lightweight, durable, and easy to grab, it’s become a non-negotiable part of my setup—especially when I’m switching between different travel camera bags
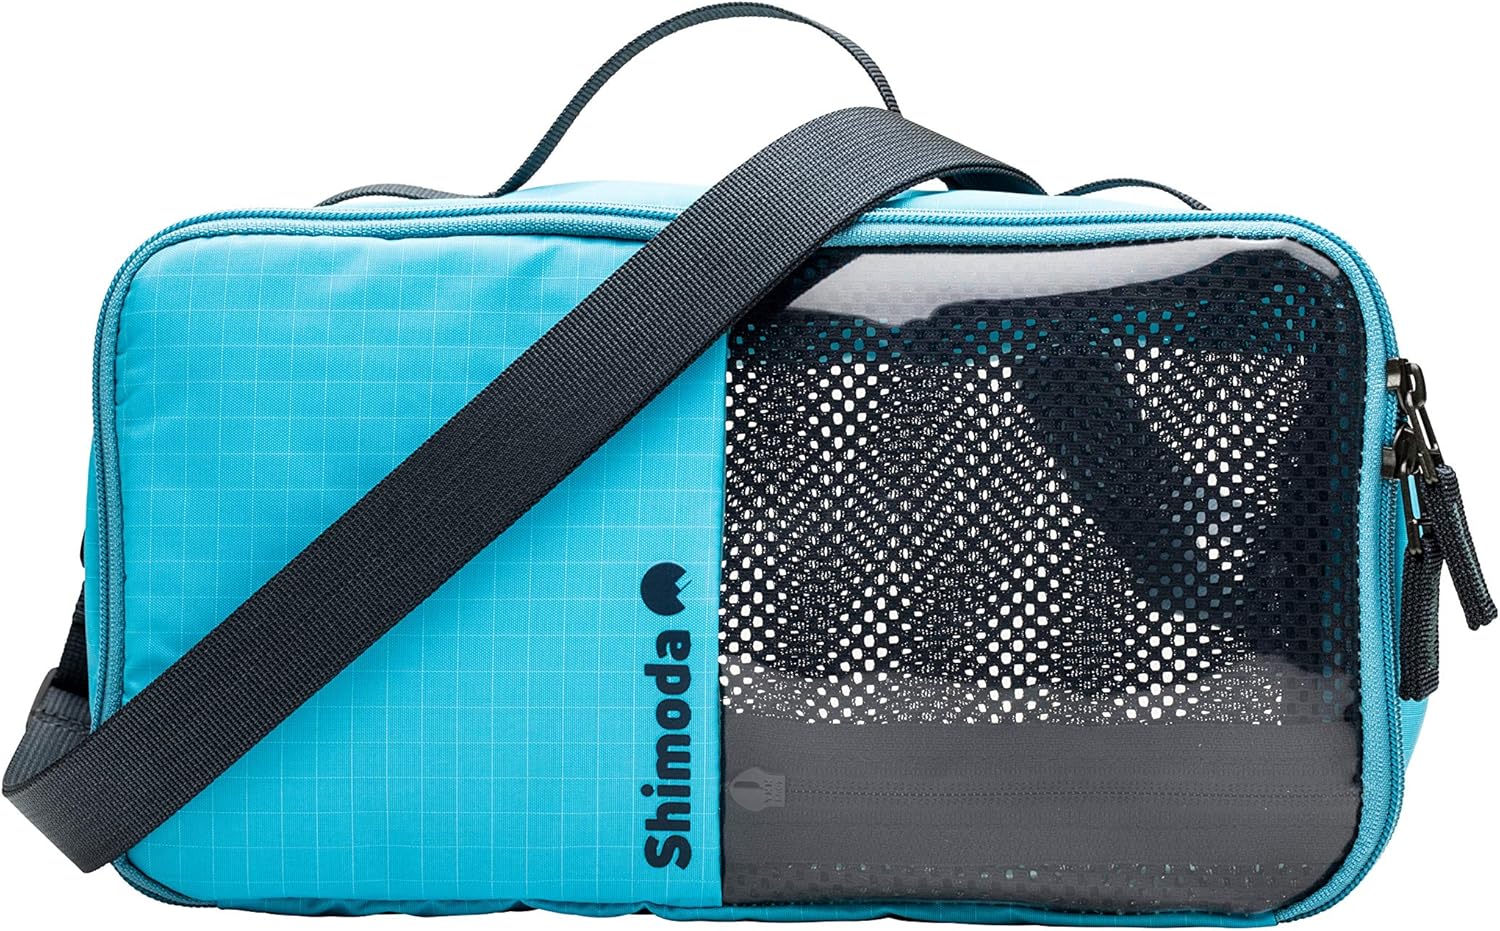
Shimoda Accessory Case Large
When I need more space for chargers, extra batteries, or larger accessories, this case handles it all. It’s padded and structured, which I like when packing for longer trips or travel by air. I also love the blue color and the clear windows—you can see exactly what’s inside without needing to open it.
Protective Lens Pouches for Wet or Rugged Conditions
When I’m kayaking, rafting, or hiking in unpredictable weather, I can’t always bring a full camera bag. That’s where these protective lens pouches come in. They let me carry essential lenses safely inside a dry bag or lightweight pack without sacrificing protection.
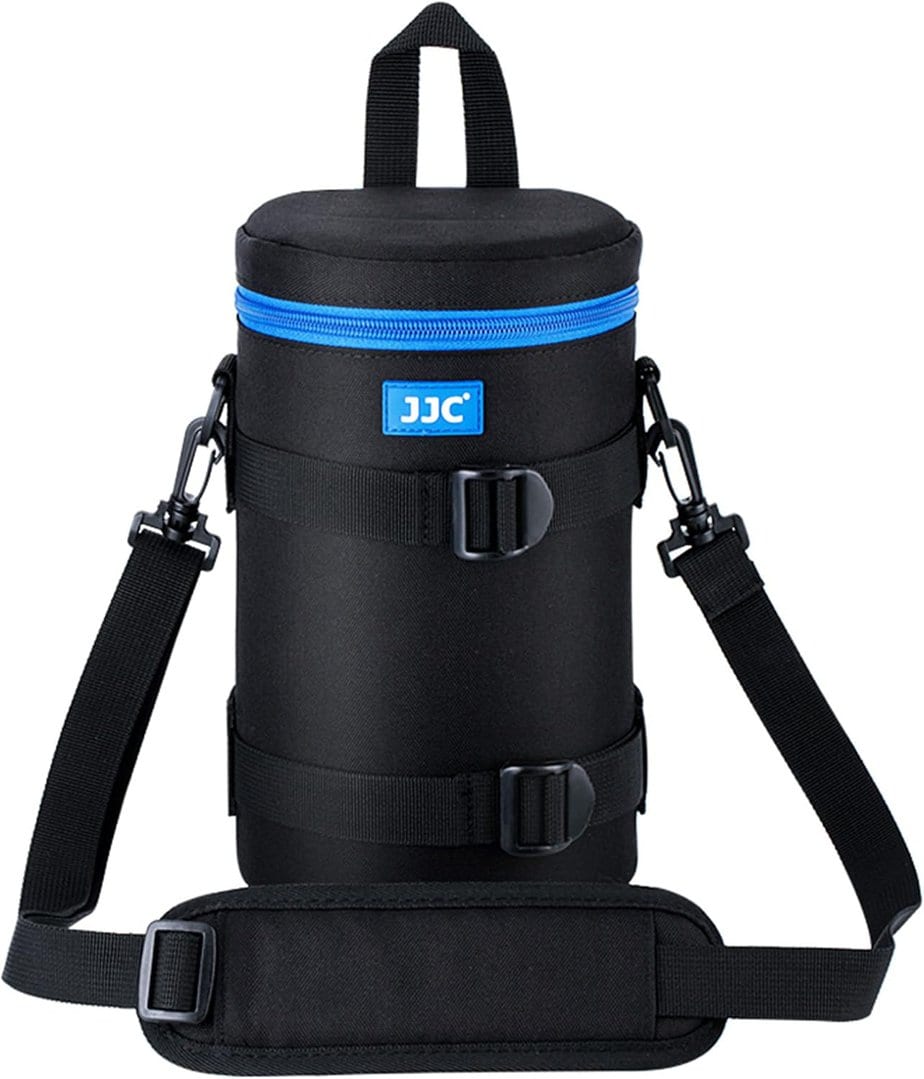
I use the JJC Large Camera Lens Pouch to house my Nikon 100–400mm lens during rafting trips on the Colorado River and kayaking sessions in Morro Bay. It’s padded, water-resistant, and tough enough to handle impact inside a dry bag. The JJC Medium Pouch is perfect for my Nikkor 12–24mm wide-angle lens, and it’s become my go-to when I need to travel light but still keep delicate gear protected.
These pouches are surprisingly affordable, and they’ve saved my lenses more than once on trips where bringing a full camera backpack wasn’t an option.
- Fits telephoto lenses up to 4.3″ x 8.8″
- Ideal for Nikon 100–400mm, 70–200mm f/2.8, and similar
- Fits lenses up to 3.9″ x 6.5″
- Works well for 12–24mm, 24–70mm, and mid-size zooms or primes
My Packing Tips for Travel Photography
Over the years, I’ve learned that when it comes to packing camera gear for travel, less is usually more. It’s tempting to bring everything, but I’ve found that keeping things simple—packing only what I truly need—makes for a smoother experience in the field. The last thing I want is to miss a shot because I’m wrestling with my gear or digging through an overstuffed bag.
Here are a few tips I follow to stay organized, mobile, and ready for whatever the day brings.
Start with the Bag That Matches the Trip
I don’t bring the same bag everywhere. For day hikes or fast-moving shoots, I pack light using my BackLight Sprint or f-stop Navin camera holster. When I’m flying or heading out for a full-day shoot with more gear, the BackLight 26L gives me the space and structure I need. Choosing the right bag for the type of shoot is the first step to keeping things simple and stress-free.
Keep Your Core Kit Ready to Grab
I always keep one of my travel camera bags pre-packed with a streamlined setup: my camera body, a lens, extra battery, memory card, and a few cleaning tools. This way, when the light turns magical, I can just grab the bag and go. My Shimoda Accessory Pouch stays packed with essentials and comes with me no matter which bag I’m carrying.
Use Inserts & Pouches to Stay Modular
I rely on modular inserts like the MindShift Gear Stash Master and Shimoda accessory pouches to make switching between bags easy. Instead of repacking everything from scratch, I just move my pre-organized pouches depending on the day. The Shimoda 4 Panel Wrap keeps filters visible and contained—no more fishing around stuff at the bottom of a bag.
Protect Your Gear in Unpredictable Conditions
When I’m on the water—like kayaking in Morro Bay or rafting the Colorado River—I use JJC padded pouches to protect lenses inside a dry bag. It’s a minimalist but effective system that keeps my gear safe without dragging along a full camera backpack.
Keep It Simple, Always
I’ve learned the hard way that complex setups slow you down. Whether I’m chasing birds, hiking to a viewpoint, or shooting sunrise in the mountains, I want to be focused on the moment—not managing gear. A light, well-organized setup always wins. Bring only what you’ll use, skip the just-in-case items, and trust your instincts. Simplicity helps you move faster, shoot more intentionally, and enjoy the experience.
Final Thoughts: Find the Bag That Works for You
If there’s one thing I’ve learned as a travel photographer, it’s that the best camera backpack for travel photography is the one that fits your style—not someone else’s packing list. What works for a fast-paced city shoot in New Mexico might be completely wrong for a long hike through the coastal trails of Point Reyes, boat tour in Morro Bay, or a multi-day trip through a rugged U.S. national park.
Over the years, I’ve tested a lot of travel camera bags—some that looked great but didn’t perform, and others that became essentials I still rely on today. Whether I’m carrying a full kit in my BackLight 26L or heading out with just a camera and lens in my f-stop Navin camera holster, the goal is always the same: stay light, stay focused, and carry only what you need. The key to choosing the best camera backpack for travel photography is matching the bag to the kind of trip you’re taking.
It’s not about having the most gear—it’s about having the right setup for the day. Keep it simple, organized, and comfortable. Once you find the bag that just works, you’ll feel it—and your photography will benefit from it.