This post contains affiliate links. If you make a purchase through these links, we may earn a commission at no additional cost to you. Learn more at my affiliate disclosure page.
Mount Whitney is not just the tallest peak in the contiguous U.S.—it’s a place where perseverance, planning, and altitude all collide. This is the full story of how we attempted (and eventually succeeded) in climbing Mount Whitney, complete with what we learned along the way, camping tips, trail notes, and gear recommendations.
It was the month of July when we decided to try our luck, drive up to Lone Pine, and hope to snag two Mount Whitney permits through the daily lottery (not available anymore) at the Eastern Sierra Visitor Center.
We had already tried to summit the couple of weeks before but had to turn back. That first attempt was a learning experience, to say the least.
First Attempt Climbing Mount Whitney: Late June Snow and Heavy Packs
We had planned a two-day trek, complete with overnight camping on the mountain. It was our first time backpacking, and we had no idea what we were doing when it came to gear weight, layering, or food.
There was still snow on the higher elevations of the Mount Whitney trail, which made our heavy packs feel even more burdensome. My wife, teenage son, and I were camping at Whitney Portal Campground—just steps from the Mount Whitney trailhead. It’s a beautiful place, shaded by pine trees and complete with bear boxes, flowing creeks, and trail talk from seasoned hikers.
Camping at Whitney Portal brought back that same peaceful feeling we always get at Morro Bay State Park—quiet mornings, chilly air, and the thrill of starting a big adventure.

We’d filled up on Chinese food in Lone Pine, which is probably not the most performance-enhancing meal, and hit the trail around noon. It was a hot day. I was sweating immediately and in a bad mood from the weight of my pack. I’ve never liked carrying anything, and this trip reminded me why.
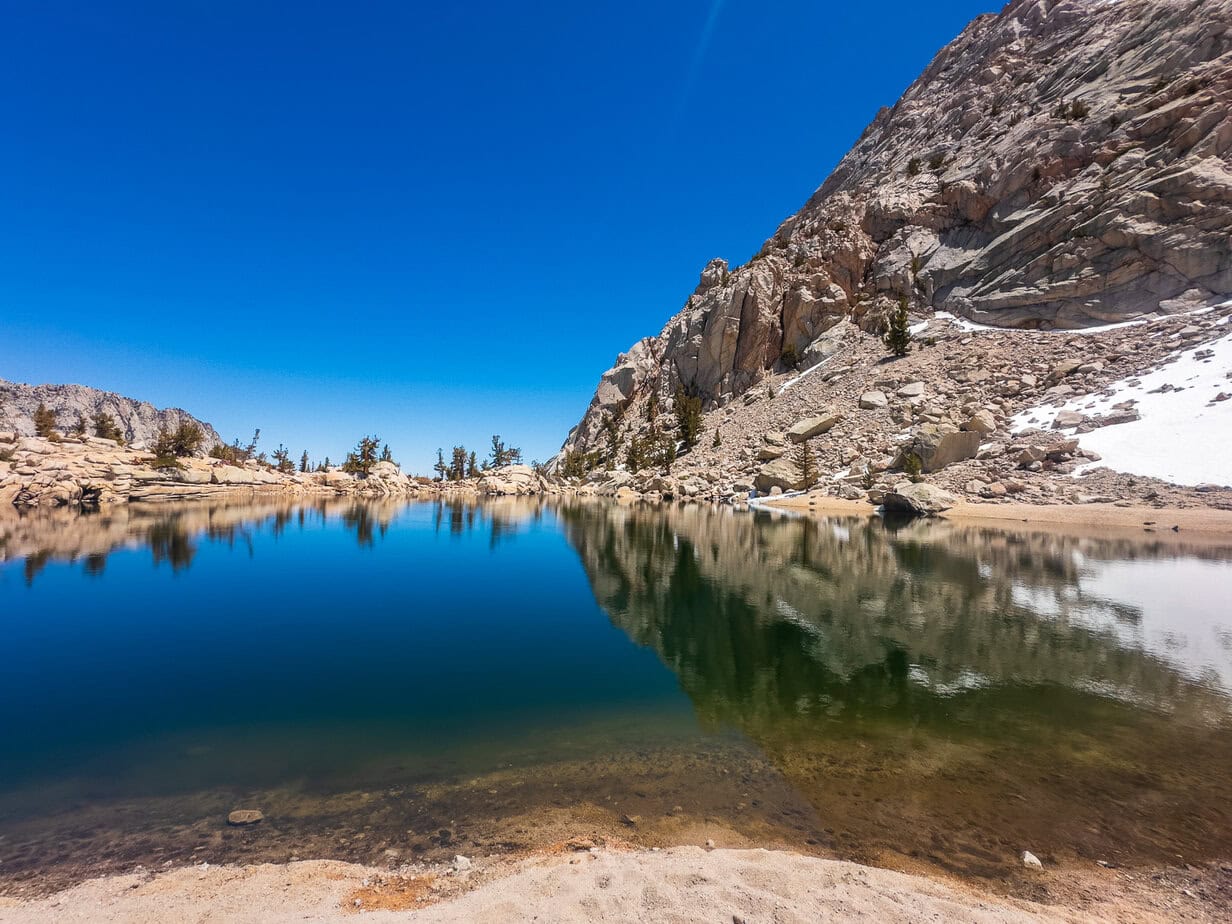
Lone Pine Lake: A Welcome Surprise
After a couple hours of uphill hiking, we arrived at Lone Pine Lake. It was like stepping into a postcard—shimmering turquoise water surrounded by granite cliffs and pines. Even if you’re not planning to summit Mount Whitney, this lake is worth the effort.

Climbing Mount Whitney Tip: Lone Pine Lake is the furthest point you can go without a permit. It’s a great out-and-back hike (about 5.8 miles round trip) for those wanting a taste of the Mount Whitney Trail without the commitment.
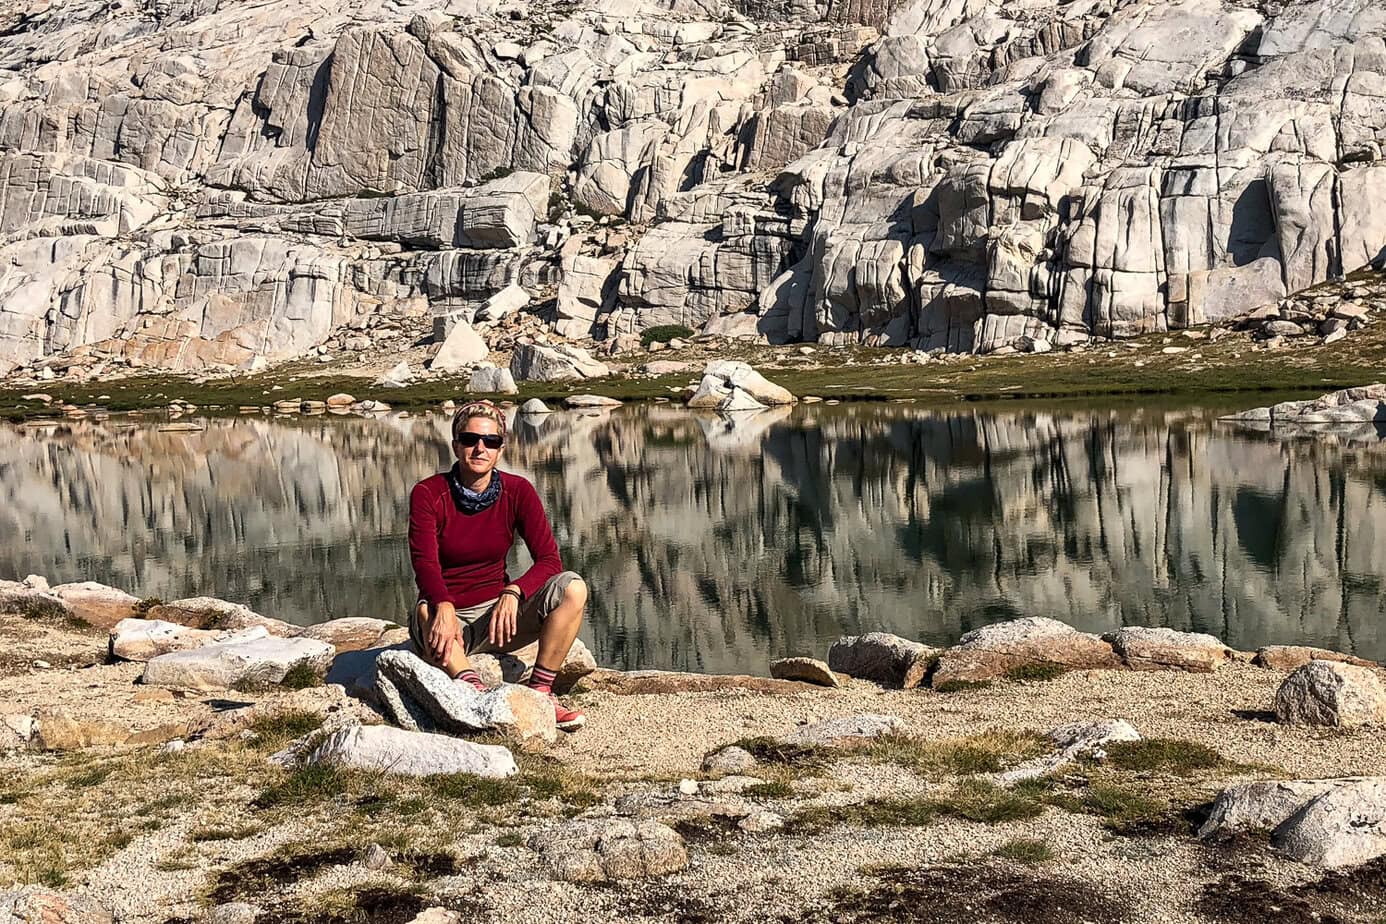
We tried to eat some snacks at the lake, but none of it was appealing. That would become a theme. As we climbed higher, my wife and son both started feeling lightheaded and nauseous—classic signs of altitude sickness. We pushed on to Outpost Camp, where we’d planned to spend the night, but things were getting worse.
The next morning, we woke before dawn, skipping breakfast and coffee without realizing the toll it would take. The Mount Whitney trail was stunning in the morning light, but the signs of dehydration and altitude stress were setting in. By the time we reached Trail Camp, my son began vomiting. That sealed it—we turned around.
Lessons We Took Home Climbing Mount Whitney
- Don’t overload your pack with unnecessary gear.
- Acclimate to the altitude with a few days in Lone Pine or higher elevations.
- Eat and drink even when you don’t feel like it.
- Watch for early signs of altitude sickness.
Despite the turn-back, the mountain had hooked us. We knew we’d try again.
The Second Attempt Climbing Mount Whitney: Slimmer Packs, Smarter Strategy
A few weeks later, we were back in Lone Pine—this time, without our son. It would be just the two of us, attempting to summitting Mount Whitney in one push, without camping on the trail.
Scoring Permits (Again)
Back then, scoring a Mount Whitney permit on the day-of felt like finding a golden ticket. The official lottery had filled months in advance, but there was still a sliver of hope: the daily walk-up permits at the Eastern Sierra Visitor Center in Lone Pine.
So we left Los Angeles at the crack of dawn, drove straight into town, and luck was on our side—we walked away with two coveted day-use permits. It was on. Round two.
Update: Walk-up permits like these are no longer available. All permits are now issued through an advance lottery on Recreation.gov, so you’ll need to plan ahead.
With permits in hand, we made our way up the winding road to Whitney Portal and set up camp beside a rushing stream. The plan was simple: eat well, acclimate, get a few hours of sleep, and hit the trail by 3 a.m.
A Storm, a Car Nap, and a Bear
But of course—man plans, and the mountain laughs.
We took a short walk to the Mount Whitney trailhead just to get a feel for the start. As we reached the top, the sky darkened. Thunder cracked. And then it poured—hard. We bolted back to camp, soaked and shivering, and ended up huddled in the car for hours as the storm raged around us. Eventually, we drifted off, hoping the skies would clear by 2 a.m.
We’d dealt with moody weather in places like Point Reyes and Montaña de Oro, but Whitney? Whitney takes it to another level—literally.
And somehow… the skies did clear.
We stepped into the still, post-storm silence, clipped on our headlamps, and started packing up our day gear. That’s when it happened. I left the bear box open for just a moment—and a small brown bear darted in, grabbed one of our Trader Joe’s bags, and took off.
In the dark, I thought it was a raccoon and gave chase—because of course, that bag had our snacks and a bottle of wine I was very much looking forward to after the climb. Behind me, my wife shouted, “Are you crazy?!”
Thankfully, the bear dropped the bag and vanished into the trees. The wine was safe. The night had already given us a story.
And then, finally, we were on our way—joining the quiet procession of headlamps zigzagging up the trail under the stars. Cool air, light packs, and a few stolen hours of sleep. Unlike our first attempt, everything felt… right.
We were ready. This time, we were going all the way.
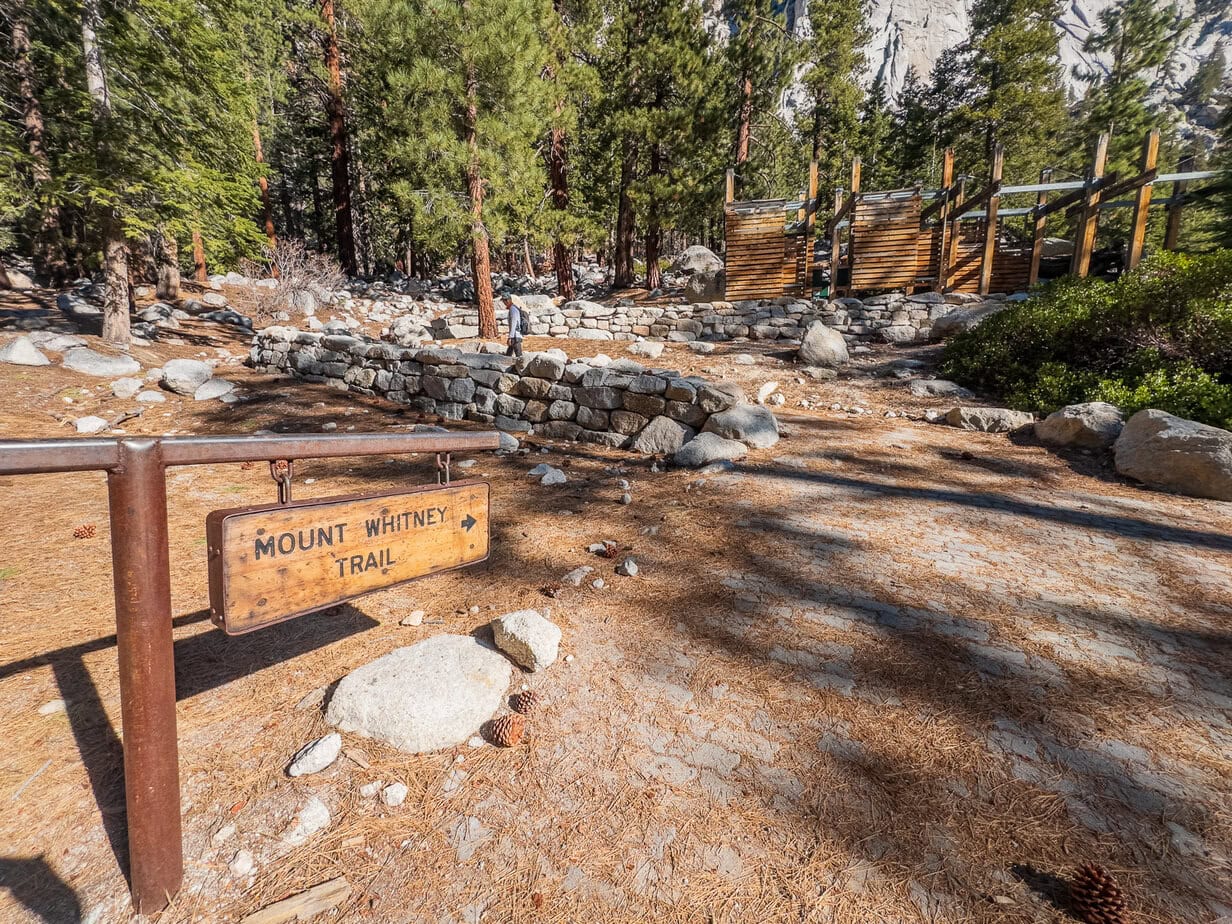
Climbing Mount Whitney by Headlamp: The Mount Whitney Hike Begins
There’s something surreal about hiking by headlamp in a line of quiet hikers, all slowly ascending together under the stars. The air was cool, our packs were light, and we felt ready.

We passed familiar spots: Lone Pine Lake, Outpost Camp, and that scenic sunrise turn where I even managed a quick trailside bathroom break. Unlike last time, we were eating and drinking steadily. The altitude was noticeable, but manageable.
We reached Trail Camp just as the sun fully lit up the ridge. This time, it wasn’t our turnaround point—it was just a rest stop.

99 Switchbacks: They’re Real
99 switchbacks. Ninety-nine. We’d heard all about them—sworn legends among Whitney hikers—and now we were in them. No snow this time, just dry trail and the endless rhythm of back-and-forth, up-and-up. Switchback after switchback… times 99. Ha!
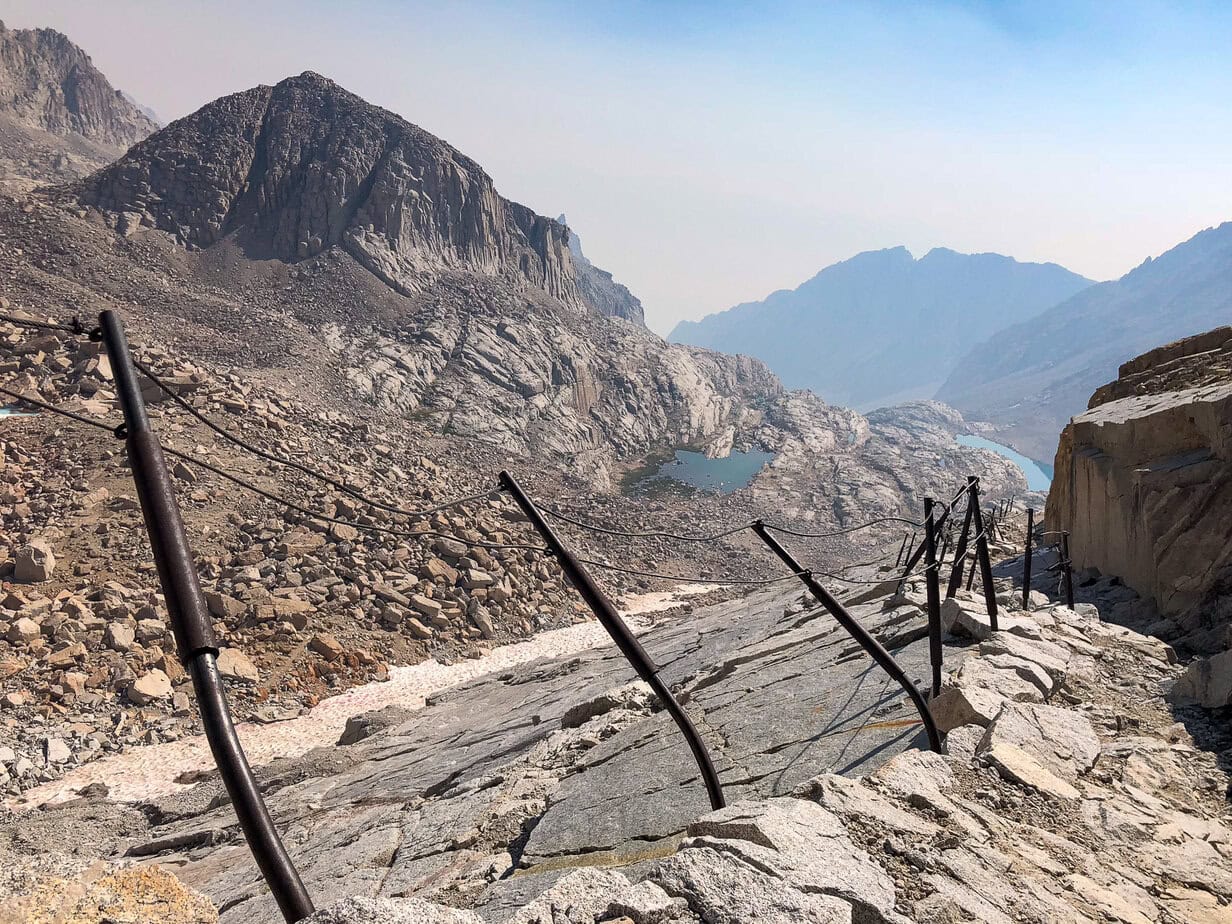
The views opened up more with each bend, and we found ourselves bonding with fellow climbers along the way—trading nods, jokes, and mutual encouragement. Despite the altitude slowly sapping our pace, we kept pushing upward, one zigzag at a time.
Just when we were really feeling the burn, a group of European trail runners breezed past us—again—bounding up and down the mountain like it was their neighborhood jog. They made it look infuriatingly easy. Spoiler: it wasn’t.
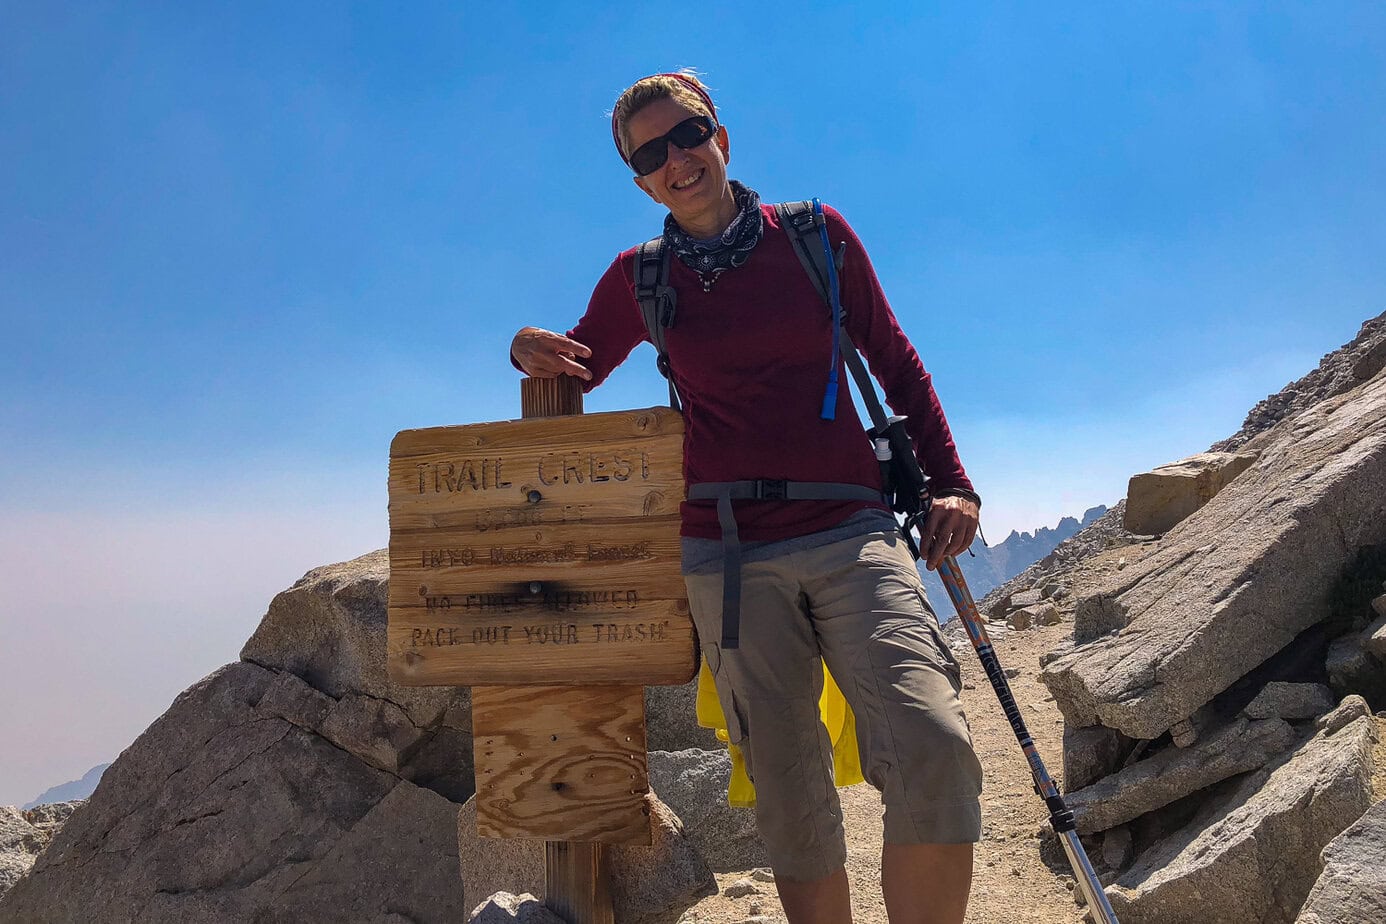
And then, just as we crested the last switchback, there it was: the sign.
Mt. Whitney 1.9

Less than two miles to the summit.
We looked at each other and grinned—sweaty, tired, exhilarated. Less than two miles, baby. We were almost there.
In hindsight, those last 1.9 miles felt like an entire marathon—hands down the longest, most brutal stretch we’ve ever experienced.
Pushing to the Top
My wife was fading fast. Altitude sickness had hit her like a wall—she was practically sleepwalking, eyes half-closed, swaying as she moved, and stopping to take micro-naps in random crevices along the trail. Full zombie mode.

It was clear: she wasn’t going to make the final push.
But me? I wasn’t ready to turn back. We were so close. I told her to rest, maybe even nap right there, and promised to find her on the way down. She gave me a tired nod, and I pressed on—reluctantly, but determined.
Somewhere in the back of my altitude-fogged brain, I worried: What if I can’t find her again? What if she moves? But my thoughts were sluggish, dulled by the thin air. I wasn’t thinking straight—I could barely walk straight. All I could do was keep moving forward.

I caught up with a couple of hikers ahead and silently joined their rhythm, following boots and footsteps, one after another.
The trail turned rocky and steep—huge boulders that felt like climbing over collapsed giants. Every step took everything I had left. One foot, then the other. Just one more. And one more after that.
And then—out of nowhere—a small, stone cabin appeared through the haze.
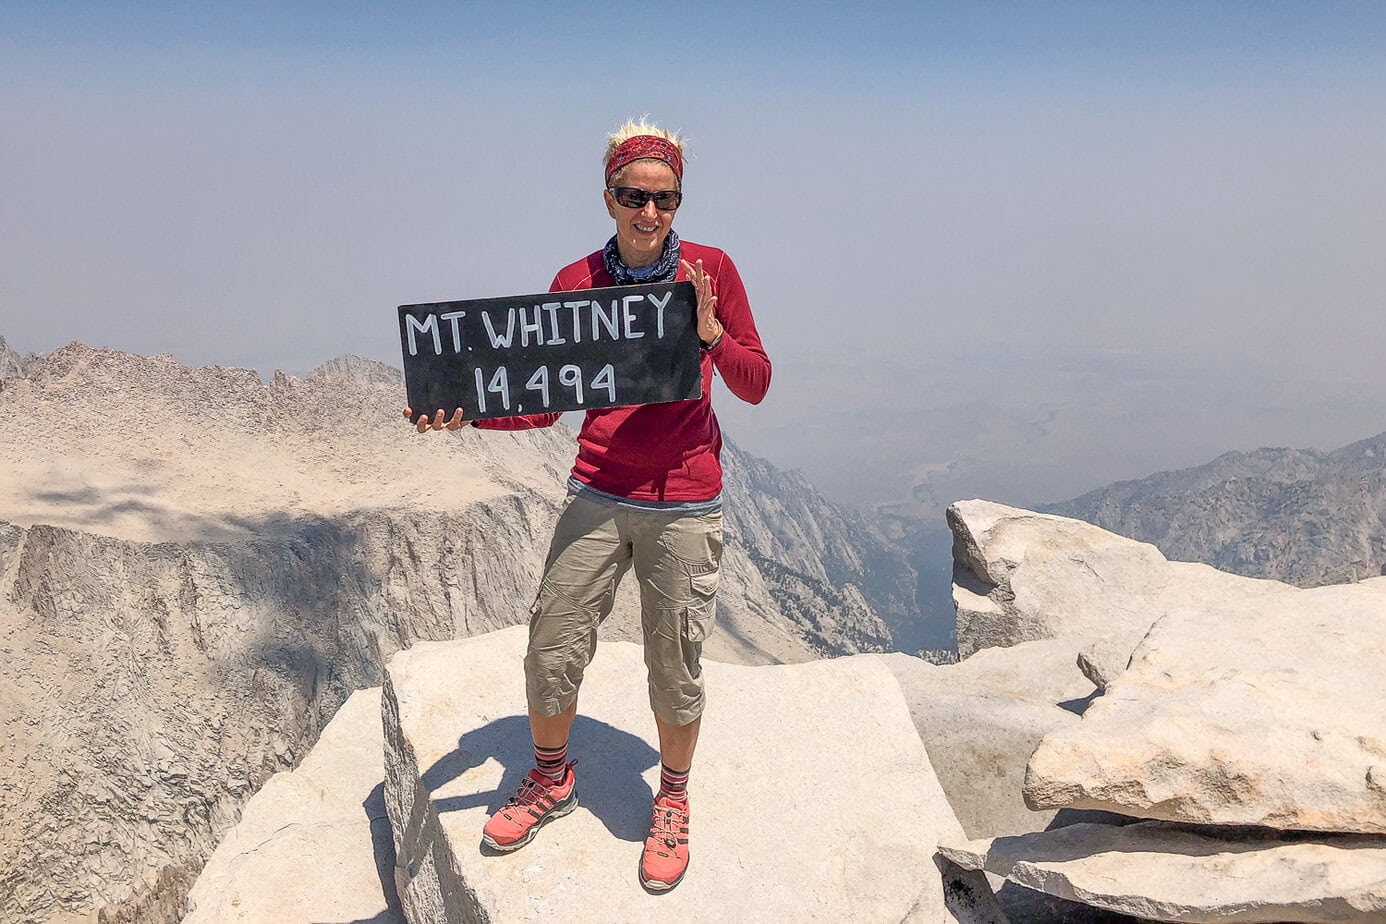
I had made it. The summit.
Summiting Mount Whitney, Joy and Descent Reality
At the top, it felt like a mini celebration. Hikers were cheering, snapping photos with the elevation sign, swapping stories, and high-fiving like we’d all just won something together. Pure mountain joy.
I found a spot, sat down, and pulled out my sandwich, soaking in the moment before heading back down to find my wife.
And then—out of the corner of my eye—I spotted a familiar shape wobbling through the rocks.
No way.
There she was, inching her way to the summit like some altitude-powered miracle. I couldn’t believe it. Somehow, through sheer grit (and maybe a little sleepwalking), she had pushed on and made it to the top.
We laughed, hugged, snapped a few more photos, and basked in the glory.

And then it hit us.
This wasn’t the end.
We were only halfway.
The summit joy faded into the background as the descent reality sank in—time to get back down. Every mile still waiting to be walked.
Yeah, Baby—We Made It (Barely)
We stumbled back into camp just after 9 p.m.—a full 18 hours after starting our hike at 3 a.m.
Completely wrecked. Barely speaking. The only words I could manage were on a broken loop: Whose idea was this? Why did we think this was a good idea? Seriously—why?
There was no celebration. No victory toast. Not even a sip of that wine I chased a bear for. Just a zombie crawl into the tent and a mutual “see you tomorrow” as we collapsed into sleep.
Sometimes summits end with fireworks. Ours ended with silence and snoring.
Morning After: Coffee, Sunshine, and Gratitude
The next morning, we woke up in surprisingly good spirits—sore, but glowing with that post-adventure satisfaction. The sun filtered through the trees, and the sound of the stream was somehow even sweeter than the day before.
We brewed some strong coffee, made a proper breakfast, and sat for a while, just soaking it all in—mountain air, warm light, and the quiet pride of knowing we did it.
Eventually, we packed up and hit the road—tired, happy, and already reminiscing about the climb of a lifetime.
Trail Overview: What to Expect on the Mount Whitney Trail
Welcome to the highest hike in the Lower 48. Climbing Mount Whitney is no stroll through the woods—it’s a high-altitude, 22-mile round-trip grind that will test your legs, lungs, and mental stamina. But the payoff? Unmatched Sierra views and serious bragging rights.
- Trailhead: Whitney Portal (8,360 ft)
- Summit: 14,505 ft – the tallest peak in the contiguous U.S.
- Round-Trip Distance: ~22 miles
- Elevation Gain: ~6,200 ft (hello, glutes)
- Typical Duration: 12 to 18 hours (if doing it in one day)
- Major Landmarks: Lone Pine Lake, Outpost Camp, Mirror Lake, Trail Camp, the infamous 99 Switchbacks, Trail Crest, and the summit hut
Day hikers hit the trail between 1–3 a.m., headlamps beaming through the dark, all in an effort to summit and get back below Trail Crest before afternoon storms roll in. Trust us—those storms don’t mess around, especially above the tree line.
If you’re hiking later in the season, prepare for unpredictable weather, colder temps, and shorter days. The trail may be long, but your window for a safe summit is short. The key? Start early, pace yourself, and keep one eye on the sky.
How to Get a Mount Whitney Permit
You’ll need more than grit and good boots to climb Mount Whitney—you’ll also need a permit. Whether you’re planning a same-day summit or a multi-day backpacking trip, permits are required every single day between May 1 and November 1 (aka the quota season).
Walk-up permits? Nope, not anymore.
Plan ahead or miss out. All permits are handled through a lottery system on Recreation.gov, and demand is fierce.
Permit Types
- Day-Use Permits – For those planning to summit and return the same day (valid midnight to midnight).
- Overnight Permits – For multi-day trips that include camping on the trail. You’ll also need to carry a bear canister and a WAG bag .
Lottery Timeline (Mark Your Calendar!)
- Lottery Opens: February 1
- Lottery Closes: March 1
- Results Announced: Around March 15
- Claim Your Permit By: April 21
- Unclaimed Permits Released: April 22 @ 7 AM PT (first-come, first-served!)
Each application lets you pick up to 10 date choices, and you can include alternate group leaders—but don’t try to game the system. Submitting multiple applications for the same group can get you disqualified.
How to Boost Your Odds
- Choose midweek dates or aim for shoulder season (early May or late September)
- Keep your group small and flexible
- Be ready to jump on cancellations—especially after April 22
- Day-use permits are often easier to score than overnights due to higher quotas
A Few Trail Rules to Know
Alternative routes to the summit—like Onion Valley or Cottonwood Pass—are available but require separate permits and more logistical planning
This is a protected wilderness zone—that means no drones, no loud music, and a strict Leave No Trace ethic.
WAG bags are required (yes, for #2)
Bear canisters must be used for all food and scented items
What to Pack: Day Hike & Overnight Essentials
Mount Whitney isn’t a hike to wing. Between the altitude, unpredictable weather, and sheer length of the trail, smart packing can make or break your experience. Keep it light, focused, and ready for anything.
Day Hike Must-Haves
If you’re planning to summit and return in a single day, these are your essentials:
- Daypack (20–30L) – Compact but roomy enough for layers, food, and water.
- Water (3L or more) – A hydration bladder plus a lightweight water filter (like Sawyer Squeeze).
- Lightweight Water Bottle – A backup to your hydration bladder; handy for refills at streams or for mixing electrolytes.
- Garmin inReach Mini 2 – A compact satellite communicator for emergency SOS, GPS tracking, and two-way messaging when you’re beyond cell service—peace of mind for you and your loved ones.
- Snacks – High-calorie, salty, and easy to eat on the go. Think trail mix, jerky, energy bars, or just a simple P&J sandwiches will also work.
- Layers – A breathable base layer, fleece or puffy jacket, and a windbreaker.
- Gloves and Hat – Even summer mornings and summit winds can feel icy.
- Sun Protection – Sunscreen, sunglasses, and a buff or sun hat.
- Trekking Poles – Invaluable for both the ascent and the steep descent.
- Headlamp – Critical for pre-dawn starts. Don’t forget extra batteries.
- Seat Cushion or Insulated Sitting Pad – Great for taking breaks on cold rocks or damp ground, especially at Trail Camp or during summit snack stops.
- First Aid Kit – Include blister treatment, ibuprofen, bandages, etc.
- WAG Bag – Required beyond Outpost Camp. There are no toilets, and Leave No Trace is a must.
Tip: Pick up your WAG bag at the Eastern Sierra Visitor Center before the hike or there are WAG bags available at the trailhead as well. Everyone is expected to pack out waste—no exceptions.
Extra Gear for Overnight Mount Whitney Treks
If you’re camping along the trail—at Outpost Camp, Trail Camp, or Consultation Lake—you’ll need to expand your gear list. Weight matters, especially at altitude, so focus on essentials and plan for quickly shifting weather.
- Backpack (45–65L) – Supportive and well-fitted for longer carries.
- Sleeping Bag – Rated to 20°F or lower. It gets cold, even in August.
- Sleeping Pad – Insulated and comfortable enough for rocky terrain.
- Tent or Bivy Sack – A 3-season tent is best for high winds at Trail Camp.
- Bear Canister – Required. All food, trash, and scented items must go inside. You can rent one from the Eastern Sierra visitor center.
- Backpacking Stove + Fuel – For hot meals and morning coffee.
- Cookware + Utensils – A small pot, mug, long-handled spoon, and cleaning cloth.
- Lightweight Meals – Freeze-dried dinners, oatmeal, instant coffee, peanut butter packs.
- Lightweight Water Bottle – A backup to your hydration bladder; handy for refills at streams or for mixing electrolytes.
- Water (3L or more) – A hydration bladder plus a lightweight water filter (like Sawyer Squeeze).
- Extra Warm Clothing – Dry base layers, insulated jacket, hat, gloves.
- Water Filtration – Sawyer Squeeze, Katadyn BeFree, or purification tablets.
- Emergency Blanket or Bivy – Adds warmth and a backup plan if needed.
- First Aid Kit – Include blister treatment, ibuprofen, bandages, etc.
Trail Camp Tip: Marmots here are bold. Many hikers leave their tents unzipped when away—these little critters will chew through zippers if they smell food or sunscreen. Always store scented items in your bear canister, never in your tent.
Where to Camp on the Mount Whitney Trail
If you’re not planning to summit in a single push, there are several designated backcountry camping areas along the Mount Whitney Trail. These are all first-come, first-served and have access to water sources. The best part? You can leave your camping gear at your site and make the final summit push with a lighter pack—much easier on the legs and lungs.

- Lone Pine Lake (9,960 ft) – Located 2.8 miles from the trailhead at about 9,960 feet, Lone Pine Lake lies just outside the Whitney Zone boundary. However, a Mount Whitney permit is still required to camp here. It’s a serene and accessible site for a more relaxed pace.
- Outpost Camp (10,365 ft) – Positioned about 3.8 miles from the trailhead and roughly 8.5 miles from the summit at 10,365 feet, this spot provides some tree cover, softer ground, and is ideal for acclimating at a lower elevation.
- Consultation Lake (11,989 ft) – A peaceful spot located near Trail Camp at 11,989 feet and about 5.5 miles from the summit. It’s slightly off the main trail, offering a bit more solitude and scenic surroundings for those looking to avoid the Trail Camp crowds.
- Trail Camp (12,039 ft) – Just under 5 miles from the summit and approximately 6.3 miles from the trailhead, Trail Camp sits at 12,039 feet and is the most popular base for summit day. The area is stark, windy, and exposed—but offers stunning views and the convenience of being right at the start of the 99 switchbacks.
Please Note: No matter which site you choose, only use existing campsites and avoid disturbing the surrounding landscape. If you’re camping on the way up, you can stash your tent and overnight gear at camp and summit with a lighter pack—huge difference in comfort and energy.
Acclimation and Safety Tips
- Spend at least a day or two at elevation before your hike. Whitney Portal or Mammoth Lakes are good basecamps.
- Sleep low, hike high if possible.
- Hydrate like crazy the day before.
- Watch for AMS symptoms: headache, nausea, fatigue, dizziness.
- Start early: Most hikers begin between 1–3 a.m. to avoid storms and heat.
- If you’re showing signs of acute mountain sickness, don’t push through. Turning back may feel like a defeat in the moment, but it’s often the smarter—and safer—call.
Recommended Reads for Inspiration
- The Mountains of California by John Muir A poetic celebration of the Sierra Nevada.
- Mount Whitney Trail Map by Tom Harrison: Indispensable for planning and route-finding.
- The Mount Whitney Guide: 30 Years on The Mountain is a personal and practical account by longtime Whitney expert Paul Richins Jr., blending trail knowledge with decades of experience. Packed with tips, maps, and stories from over 30 years on the mountain, this guide offers both first-time hikers and seasoned summit-seekers a reliable companion for tackling the tallest peak in the Lower 48.
- Mount Whitney: The Complete Trailhead to Summit Guide by Paul Richins Jr. :A detailed, practical guidebook by Paul Richins Jr. covering everything you need to plan a successful Mount Whitney hike—from permits and route options to camping tips, maps, and altitude prep.
Final Thoughts on Climbing Mount Whitney
If you’re climbing Whitney, you’re deep in the heart of the Eastern Sierra—one of my favorite regions in California. Beyond the trail’s 22‑mile round-trip and 6,000 ft elevation gain—with its 99 switchbacks and summit hut history there’s so much more waiting to be explored. I’ve put together a full Eastern Sierra Travel Guide with top hikes, towns, hot springs, scenic drives, and park detours—perfect if you’re extending your Mount Whitney adventure or planning your next return trip.
Till this day, climbing Mt Whitney has been one of my favorite adventures—and definitely the hardest trail we’ve ever done.
Love Mount Whitney! Just last month we camped at Lone Pine Campground and did a day hike to Lone Pine Lake. We always feel that pull to keep going up the mountain. But thankfully, you need permits to go beyond… so, no can do. Not this time.
But who knows? Maybe one day we’ll give it another go. Whitney’s not done with us yet.
About the Author
This post was written by Roni Rok, a proud Los Osos local, avid hiker, and passionate shell and rock collector. Her days often begin with early-morning treks along the trails of Montana de Oro, where she finds endless inspiration for both her art and her life. Beyond her love for nature and beachcombing, Roni is a talented jewelry artist who transforms her natural treasures into stunning creations. When she’s not exploring the shoreline or crafting in her workshop, you might find her tending to her garden, playing pickleball, or sharing her wealth of knowledge about the wonders of the Central Coast.